github webhooks 简明教程

服务器侧配置

Goal: 以本博客为例, 本地 hexo 写完文章, hexo g d => 自动 deploy 到 github pages => 触发个人网站服务器自动更新静态文件

涉及到的技术栈:

  • node(pm2)
  • nginx
  • github pages
  • github hooks

自动部署脚本

这里自理一下, 对于我来说只需要从 github 拉取最新的静态文件即可, 不需要打包

网站根目录新建deploy.sh内容如下:

1
2
3
4
5
6
7
8
9
10
#!/bin/bash

SITE_PATH='/www/wwwroot/trainspott.in'

cd $SITE_PATH
git reset --hard origin/master
git clean -f
git pull
git checkout master

设置可执行

1
chmod 775 ./deploy.sh

webhookHandler 配置

服务端需要跑一个监听的程序

npm 安装依赖github-webhook-handler

1
npm i github-webhook-handler -S

网站根目录新建webhookHandler.js内容如下:

需要注意的是第 7/8/18 行的 3 个字段

1
2
3
4
5
6
7
8
9
10
11
12
13
14
15
16
17
18
19
20
21
22
23
24
25
26
27
28
29
30
31
32
33
34
35
36
37
38
39
40
41
42
43
44
45
46
47
48
49
50
51
52
53
54
55
var http = require("http");
var spawn = require("child_process").spawn;
var createHandler = require("github-webhook-handler");

// 下面填写的myscrect跟github webhooks配置一样,下一步会说;path是我们访问的路径
var handler = createHandler({
path: "/auto_build",
secret: "{{secret}}", // 自己生成一个秘钥字符串, 自己记住别忘了, 待会github配置要用
});

http
.createServer(function (req, res) {
handler(req, res, function (err) {
res.statusCode = 404;
res.end("no such location");
});
})
.listen(6666); //此处与

handler.on("error", function (err) {
console.error("Error:", err.message);
});

// 监听到push事件的时候执行我们的自动化脚本
handler.on("push", function (event) {
console.log(
"Received a push event for %s to %s",
event.payload.repository.name,
event.payload.ref
);

runCommand("sh", ["./deploy.sh"], function (txt) {
console.log(txt);
});
});

function runCommand(cmd, args, callback) {
var child = spawn(cmd, args);
var resp = "Deploy OK";
child.stdout.on("data", function (buffer) {
resp += buffer.toString();
});
child.stdout.on("end", function () {
callback(resp);
});
}

// 如果需要监听issues,打开下面的代码
// handler.on('issues', function (event) {
// console.log('Received an issue event for %s action=%s: #%d %s',
// event.payload.repository.name,
// event.payload.action,
// event.payload.issue.number,
// event.payload.issue.title)
// });

启动监听服务

1
2
3
4
5
6
node /{{your-path}}/webhookHandler.js

# OR

pm2 start /{{your-path}}/webhookHandler.js
pm2 save

Nginx 配置

1
2
3
4
5
6
7
8
9
10
11
12
13
14
15
16
location /auto_build {
proxy_pass http://127.0.0.1:6666;
}


location ~ ^/(deploy.sh|hexo-webhookHandler.js) {
return 404;
}

# `location` 与 webhookHandler 中
# createHandler({
# path: "/auto_build",
# secret: "{{secret}}",
# }); 的 path 一致

# `proxy_pass` 的端口与webhookHandler中配置的http.createServer().listen(6666) 中的端口一致

如果成功,访问 https://{your-domain}/auto_build 会显示如下图:
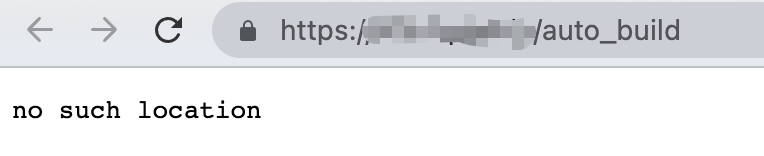

github 配置

  1. 进入https://github.com/stariveer/{{your-repo}}/settings/hooks
  2. 点击Add webhook
  3. 如下图配置
  4. 本地执行一次git push
  5. 如果上面所有步骤都成功, 返回https://github.com/stariveer/{{your-repo}}/settings/hooks, 将显示如下
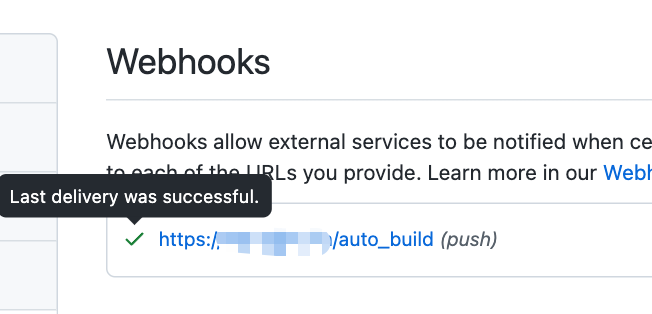
EOF